The scope of the Secure Image Policy encompasses all future development activities undertaken by the company, ensuring that all new systems, features, and services adhere to the established security standards for image handling and management
This document applies to :
· Image Creation process in a secure way (CI/CD)
· Image Storage (registry) & IAM
· Image Vulnerability management
· Image Storage (registry) vulnerability management
This document has not intended to cover:
· Image Hardening
Purpose
Ensuring that the images used by containers are secure within a company is crucial for several reasons, reflecting broader concerns about cybersecurity, data protection, and operational integrity in the digital age.
Here's why image security is essential in a corporate environment:
Data Protection: Containers often run applications that process sensitive data, including personal information, proprietary business data, and credentials. Secure images ensure that the applications they run are free from vulnerabilities that could be exploited to access or steal this data.
Preventing Unauthorized Access: Secure container images help prevent unauthorized access to the company's internal networks and systems. Containers with vulnerabilities can serve as entry points for attackers to penetrate deeper into the corporate infrastructure, leading to potential data breaches or system compromises.
Compliance and Regulatory Requirements: Many industries are subject to strict regulatory requirements regarding data protection and cybersecurity (e.g., GDPR, HIPAA, PCI-DSS). Using secure container images helps ensure compliance with these regulations by minimizing the risk of data breaches and unauthorized access to sensitive information.
Maintaining System and Application Integrity: Secure images are less likely to contain malware or other malicious code that could compromise the integrity of the containerized applications and the underlying infrastructure. This is essential for maintaining the reliability and availability of services, especially in critical systems.
Cost Avoidance: Security breaches can be extremely costly, not just in terms of direct financial losses (e.g., fines, remediation costs) but also in terms of reputational damage and lost business. Ensuring container images are secure helps mitigate these risks and avoid the significant costs associated with security incidents.
Supply Chain Security: Containers often rely on images from external sources or base images that are then customized for specific applications. Ensuring the security of these images is a critical component of securing the software supply chain, protecting against vulnerabilities that could be introduced at various stages of the development and deployment process.
Rapid Response and Patch Management: Secure container images are regularly updated to address new vulnerabilities as they are discovered. This allows companies to respond more quickly to emerging threats, reducing the window of opportunity for attackers to exploit known vulnerabilities.
To achieve these objectives, Your company needs to employ various strategies, including the use of trusted base images, regular scanning of images for vulnerabilities, implementing image signing and verification to ensure authenticity, and enforcing policies that only allow images that meet specific security criteria to be deployed. Additionally, embracing a culture of security within the development lifecycle, from image creation through deployment, is key to maintaining the security posture of containerized applications.
Terms & Definitions
Image
A lightweight, standalone, executable package that includes everything needed to run a piece of software, including the code, runtime, system tools, system libraries, and settings.
Image Registry
A service where container images are stored, organized, and managed, allowing users to upload, share, and download images across different environments and systems.
Container
A standard unit of software that packages up code and all its dependencies, so the application runs quickly and reliably from one computing environment to another.
Build Process
A process is the series of steps taken to create a container image from a set of instructions defined in a Dockerfile or similar configuration file, encompassing the application code, dependencies, and environment settings.
Docker
A platform that automates the deployment of applications inside lightweight, portable containers, facilitating easier packaging, distribution, and management of applications across different environments.
Azure DevOps
A suite of development tools provided by Microsoft, offering services for version control, reporting, requirements management, project management, automated builds, testing, and release management to support continuous integration and deployment.
Service Connection
A predefined set of credentials and settings that allow Azure DevOps to access external services or resources, such as code repositories, container registries, or deployment targets, for continuous integration and deployment processes.
Service Principal
A security identity used by applications or services to access specific Azure resources, allowing for controlled permissions and access within Azure Active Directory.
Build Breaker
A build breaker refers to a critical security flaw detected during the image creation process in Azure DevOps, which leads to the build being halted to prevent the deployment of a compromised container image.
BASICS
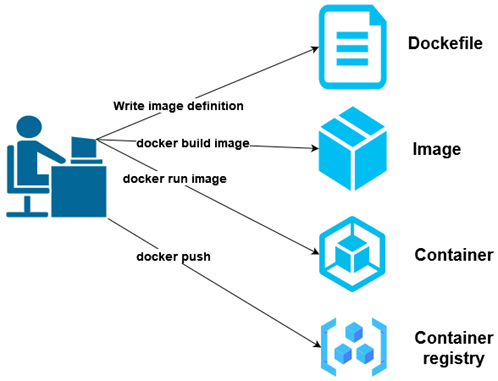
Creating a Docker image, running it as a container, and pushing it to a registry involves several steps, each serving a distinct purpose in the lifecycle of a Dockerized application. Here's an overview of how these components are linked together:
1. Create a Dockerfile: A Dockerfile is a text document that contains all the commands a user could call on the command line to assemble an image. It starts with specifying a base image with the FROM instruction and then includes additional instructions to copy files, install dependencies, set environment variables, and define entry points among others.
FROM python:3.8-slim

# Set the working directory in the container
WORKDIR /app

# Copy the current directory contents into the container at /app
COPY . /app

# Install any needed packages specified in requirements.txt
RUN pip install --trusted-host pypi.python.org -r requirements.txt

# Make port 80 available to the world outside this container
EXPOSE 80

# Define environment variable
ENV NAME World

# Run app.py when the container launches
CMD ["python", "app.py"]
2. Build an Image: Once you have a Dockerfile, you can build an image using the docker build command, specifying a tag with -t to easily identify the image later.
|
docker build -t my-python-app . |
This command builds an image from the Dockerfile in the current directory (.) and tags it as my-python-app.
3. Run an Image: After the image is built, you can run it as a container using the docker run command. You can specify various runtime options like port mapping, environment variables, etc.
|
docker run -p 4000:80 my-python-app |
This runs the my-python-app container and maps port 4000 on the host to port 80 inside the container, allowing you to access the application via http://localhost:4000.
4. Push an Image to a Registry: Finally, to share your image or deploy it on other machines, you need to push it to a Docker registry, such as Docker Hub or Azure Container Registry. Before pushing, you might need to tag your image with the registry's address and log in to the registry.
Tagging and Pushing Example:
|
docker tag my-python-app myregistry.azurecr.io/my-python-app docker push myregistry.azurecr.io/my-python-app |
First, you tag the image with the full registry path. Then, you push it to the specified registry. This requires you to have access rights to the registry and possibly to log in before pushing.
Linking the Steps:
- The Dockerfile defines what goes on in the environment inside your container. It allows you to codify the actions needed to assemble your application.
- Building an image from the Dockerfile packages your application and its environment into a container that can be run on any Docker engine.
- Running the image as a container allows you to deploy and test your application in an environment identical to the one you defined in your Dockerfile.
- Pushing the image to a registry enables sharing and distribution of your containerized application, facilitating deployment across different environments or team collaboration.
This workflow embodies the containerization philosophy, encapsulating your application and its dependencies into a portable and easily distributable form.
IMAGE REGISTRY
Securing an image registry is crucial in the context of software development, especially when dealing with containerized applications. An image registry is a repository for storing and distributing container images. These images contain the code, libraries, dependencies, and other necessary parts to run applications. If an image registry is compromised, it can lead to severe consequences, including unauthorized access to sensitive information, data breaches, and widespread distribution of malware or malicious code.
1. Access Control
- Authentication and Authorization: Ensure that access to the image registry is restricted to authenticated and authorized users only. Implement strong authentication mechanisms (e.g., two-factor authentication) and fine-grained access controls to limit who can push and pull images.
- Role-Based Access Control (RBAC): Define roles within your organization and assign permissions based on the least privilege principle, ensuring users have only the access necessary for their role.
1. Project with dependency with another project

On-premises Azure DevOps
- Build Agent: This is where the code is compiled or built. There are different pipelines associated with different projects (Project 1 to Project 4 in this example), each responsible for automating the build and deployment process of the application.
- Pipeline: Each project has its own pipeline which defines the build and release processes.
- Service Connection: This is a linkage between the Azure DevOps pipeline and the Azure services, allowing Azure DevOps to authenticate and deploy resources to Azure.
Azure Container Registry (ACR)
- Service Principal: For each project, a service principal (essentially an identity used for service-to-service interactions) is used to authenticate against Azure services. There's a separate service principal for each project to maintain isolation and fine-grained access control.
- Repo Project: Each project has its corresponding repository in ACR where container images built by the pipeline are pushed to.
Workflow:
- Each project's codebase is built using the respective Azure DevOps pipeline.
- Upon a successful build, the pipeline pushes the container image to the Azure Container Registry.
- Access control is enforced at this stage where only the authorized service principal can push images to the ACR.
- The images reside in their respective project repositories within the ACR, ready for deployment to the appropriate environments.
1. Project with dependency with another project
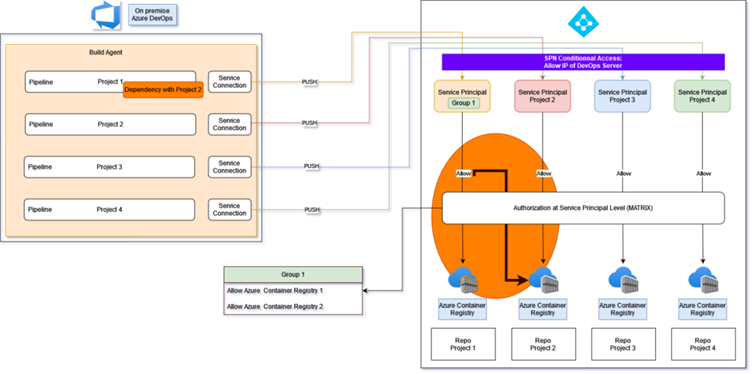
On-premises Azure DevOps
- Build Agent: The server where the builds are run. There are four separate pipelines for different projects (example Project 1 to Project 4).
- Pipeline: Each project has its own CI/CD pipeline. Project 1 has a noted dependency on Project 2, which suggests that the build or release of Project 1 is contingent upon the successful completion of Project 2's pipeline tasks or the project needs to get an image from the Project repository.
- Service Connection: These are the connections that enable the Azure DevOps pipelines to communicate with external services, such as the Azure Container Registry.
Azure Container Registry (ACR)
- Service Principal Group 1: This is a collective identity for services, used for authentication with Azure resources. Group 1 is granted access to multiple container registries, indicated by "Allow Azure Container Registry 1 & 2".
- Repo Project: Each project has a repository in the ACR where container images are stored.
Authorization at Service Principal Level (MATRIX)
- This element shows that there is a matrix of authorizations in place at the service principal level. It implies more granular access control where specific permissions are given to each service principal for interacting with the ACR.
- The arrows show that Service Principal Group 1 has access to the first two container registries, while each of the other service principals has access to its respective registry.
Workflow:
- Each project's code is built in its respective pipeline. Project 1's build might depend on Project 2.
- After a successful build, the pipeline pushes the container image to the designated ACR.
- The service principal for each project manages authentication, with Group 1 having access to the first two registries, illustrating shared or cross-project permissions.
- The authorization matrix ensures that service principals have the correct permissions to access and push to their assigned ACR repositories.
This updated schema indicates a more complex access control scenario where dependencies between projects and shared access to registries for certain groups of service principals are defined, showcasing a need for precise access control to maintain security and integrity in a more interconnected CI/CD process.
2. Secure Connections
- Transport Layer Security (TLS): Use TLS to encrypt data in transit between your Docker client and the image registry to prevent eavesdropping and man-in-the-middle attacks.
- Certificate Validation: Ensure that the certificates used for TLS are valid and trusted to avoid trust-based attacks.
1. Registry access from Docker command
To access ACR registries via docker command, HTTPS is enforced by default.
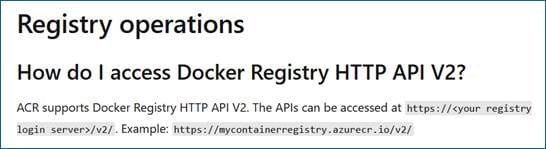
Source :
https://learn.microsoft.com/en-us/azure/container-registry/container-registry-faq
2. Registry access from Azure DevOps on-premise via Service principal
Service principal used to connect to Active Directory through Azure DevOps Service Connection to Azure ACR registries always use HTTPS.
Source:
Deprecating weak cryptographic standards (TLS 1.0 and 1.1) in Azure DevOps Services - Azure DevOps Blog (microsoft.com)
Secure Service connections in Azure Pipelines - Azure Pipelines | Microsoft Learn
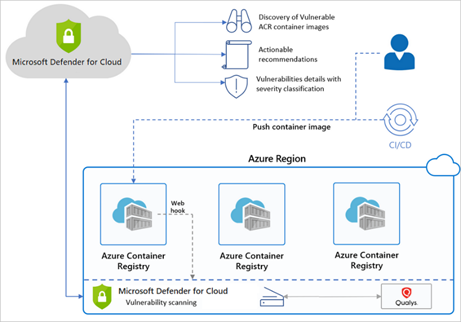
3. Image Scanning and Vulnerability Management
- Regular Scanning (Registry Level): Automatically scan images in registries for known vulnerabilities. This helps identify and remediate vulnerabilities before they are delivered to your customers. Here, we made the choice of using Microsoft Defender for Cloud.
|
Azure Subscription |
Registry name |
Type |
Microsoft Defender for Cloud |
|
ACR Prod |
acrprod |
Production |
Mandatory |
|
ALL |
ALL |
Dev |
Preferred depending on pricing |
- Image Signing and Verification: Implement mechanisms to sign images and verify their integrity and origin to ensure that the images have not been tampered with or replaced by malicious ones.
4. Registry Configuration and Security Policies
- Private Registry: Consider using a private image registry to have more control over the security and access policies compared to public registries.
- Security Policies: Define and enforce security policies for image creation, storage, and deployment, such as only allowing images that pass vulnerability scans to be deployed.
5. Monitoring and Logging
- Audit Logs: Keep detailed logs of all actions taken on the registry, including who accessed it and what operations were performed. This is critical for identifying suspicious activities and conducting forensic investigations in case of a security incident.
- Continuous Monitoring: Monitor the registry and the images it stores for anomalies, such as sudden spikes in pull requests or unauthorized access attempts, to detect and respond to threats promptly.
6. Patch Management
- Regular Updates: Regularly update the registry software and the operating system it runs on to patch known vulnerabilities. This also applies to container images, which should be rebuilt with the latest security patches.
Securing an image registry involves a multi-layered approach that encompasses not just the technology but also processes and people. Implementing strong security practices at each point ensures that container images remain secure, thus protecting the applications that rely on them from potential threats.
IMAGE SECURITY & CI/CD
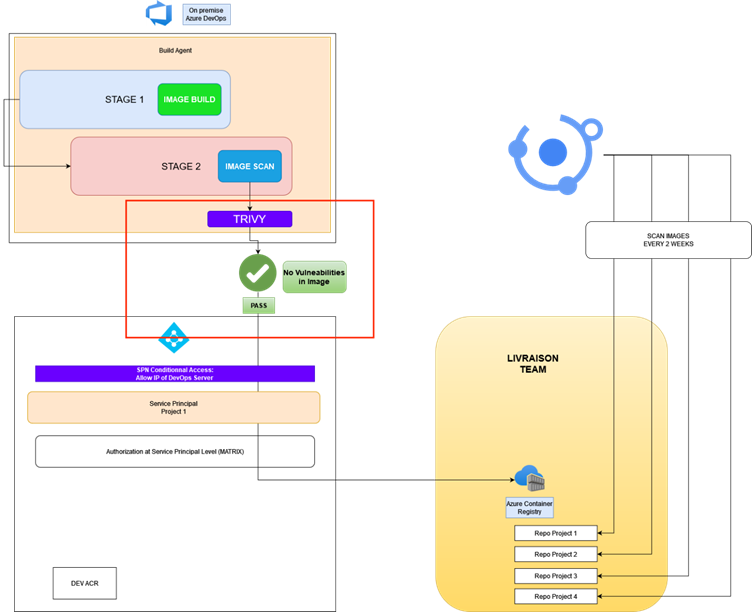
The overall goal of integrating Trivy into a CI/CD pipeline is to ensure that images are scanned for vulnerabilities before they are deployed, improving the security posture of the applications. Trivy, a comprehensive security scanner, can scan for vulnerabilities in your container images, file systems, and even source code repositories.
Step 1: Integrating Trivy into the CI/CD Pipeline
1. Setup Trivy in the CI Environment: The CI pipeline must have Trivy installed and configured. This can be achieved by including a step in the pipeline configuration that pulls the latest version of Trivy and installs it in the CI runner environment.
2. Scanning the Code or Image: After the setup, the next step involves scanning the Docker images or codebases. This is typically done after the build process, where the newly created Docker image or application code is scanned. The command to scan an image with Trivy looks like this: trivy image [your_image_name]. If you're scanning source code, you might use trivy fs pointing to your file system.
3. Analyzing the Scan Results: Trivy outputs a list of detected vulnerabilities along with their severity levels (CRITICAL, HIGH, MEDIUM, LOW). This output is crucial for deciding whether to proceed with the deployment or not.
Step 2: Implementing the Build Breaker Logic
1. Setting Severity Thresholds: Decide on the severity level of vulnerabilities that you consider unacceptable (e.g., CRITICAL and HIGH). This threshold is crucial for the build breaker logic.
2. Parsing Trivy Output: The CI pipeline script needs to parse the output from Trivy to identify if any vulnerabilities exceed your predefined thresholds.
3. Breaking the Build: If vulnerabilities above the threshold are found, the CI pipeline script should exit with a non-zero status, effectively "breaking" the build. This means the pipeline will halt, and the image will not progress to the deployment stage. This step is crucial for preventing vulnerable code or images from being deployed.
Step 3: Implementing the Exception Mechanism
To accommodate the need for flexibility within the strict security measures provided by Trivy in CI/CD pipelines, it's essential to implement an exception mechanism. This allows for certain known, accepted vulnerabilities or libraries to be ignored during the scanning process, ensuring that development can proceed without unnecessary interruptions while maintaining an overall high level of security. Here's how you can integrate such an exception mechanism into your CI/CD pipeline:
1. Creating an Exception File: Each project should have a dedicated exception file. This file lists libraries or specific vulnerabilities that are known to the team and have been deemed acceptable risks or false positives. The format of this file must be and be named exclusions.json, making it easy to read and update.
2. Structure of the Exception File: The exception file should be structured to easily specify not just the libraries or vulnerabilities to ignore, but also potentially the conditions under which they're ignored. For example:
|
[ { "library_name": "libtinfo5", "date": "2024-03-07" } ] |
3. Integrating Exception Logic in the CI Pipeline:
· Parsing the Exception File: During the CI pipeline execution, before or after running Trivy, parse the exception file to understand which vulnerabilities or libraries should be ignored.
· Filtering Trivy Output: After Trivy scans the code or image and outputs its findings, the next step is to filter these results against the exception list. This involves removing or ignoring any vulnerabilities that match the exceptions defined.
· Decision Making with Exceptions: Post-filtering, the build breaker logic then proceeds as normal with the adjusted list of vulnerabilities. If no unaccepted vulnerabilities are found, the pipeline continues; otherwise, it breaks.
4. Maintaining the Exception File:
· Regular Review: The exception list should be regularly reviewed and updated as part of the project's security governance process. This ensures that exceptions are still valid and that any new vulnerabilities are assessed appropriately.
· Documentation: Each exception should be clearly documented with the rationale for its inclusion. This documentation is crucial for audit purposes and for new team members to understand the project's security posture.
Step 4: Handling Breaks and Remediation
1. Notification: Upon breaking the build, the pipeline should notify the development team about the vulnerability findings. This could be through email, Slack, or any other communication tool used by the team.
2. Vulnerability Management: The team reviews the vulnerabilities. Critical ones are addressed immediately, while others might be prioritized based on severity and impact.
3. Retesting and Validation: Once vulnerabilities are fixed, the code or image should be re-submitted to the CI/CD pipeline for another round of scanning. This cycle continues until the scan passes without triggering the build breaker.
Step 5: Continuous Improvement
1. Updating Policies and Thresholds: Over time, as projects evolve, so should the security policies and thresholds to adapt to new security standards and threat landscapes.
2. Upgrading Trivy: Regularly update Trivy to ensure it can detect the latest vulnerabilities.
3. Feedback Loop: Create a feedback loop where developers are educated on common vulnerabilities and best practices to avoid them in the future, fostering a culture of security awareness.
Integrating Trivy as a build breaker in CI/CD pipelines emphasizes the importance of security in the DevOps lifecycle. By automating vulnerability scanning and implementing strict thresholds, you company can significantly reduce the risk of deploying vulnerable applications, ensuring a more secure software delivery process.
CONFIDENTIAL DATA IN IMAGE
In the fast-paced world of software development and deployment, maintaining the integrity and security of container images is paramount. As organizations increasingly rely on containerized applications for their flexibility and efficiency, the potential risk of exposing confidential data through these containers has become a critical concern. Confidential data, whether it be passwords, API keys, or sensitive personal information, embedded within container images can lead to severe security vulnerabilities, including unauthorized access and data breaches.
Recognizing this risk, it is essential for organizations to implement robust policies and practices aimed at preventing the inclusion of confidential data in container images. This involves not just the technological solutions but also a cultural shift towards security-aware development practices. The goal of such policies is to ensure that all container images, whether used in development, testing, or production environments, are free from sensitive information that could compromise the security of the organization or its customers.
To achieve this, your company must adopt a comprehensive approach that includes educating and training their development and operations teams, integrating secret detection and vulnerability scanning tools like Trivy into their Continuous Integration/Continuous Deployment (CI/CD) pipelines, and establishing clear protocols for responding to incidents where confidential data is detected.

The diagram above illustrates the schema of the secret scanning process in Trivy. This process can be broken down into three main phases:
Scan Initiation: Trivy initiates scans on container images, filesystems, and Git repositories. This scanning is enabled by default and is the first step in identifying potential secrets hidden within the code or image layers.
Secret Detection: During this phase, Trivy utilizes both built-in and custom rules to accurately identify a wide variety of secrets, such as AWS access keys, personal access tokens, and more. This step is crucial for pinpointing the exact locations and types of secrets embedded in the scanned entities.
Reporting & Action: Once the scanning is complete, Trivy outputs detailed reports that include the type of secret detected, its location, and the severity of the exposure. Additionally, Trivy allows for configuration adjustments to skip scanning known test secrets or non-sensitive data, helping to streamline the scanning process and focus on significant findings.
This schema outlines the structured approach Trivy takes to ensure thorough secret detection and reporting, enabling organizations to better manage and mitigate the risks associated with unintended secret exposures.
Secret Scanning
Trivy's secret scanning feature is designed to detect exposed secrets such as passwords, API keys, and tokens within container images, filesystems, and Git repositories. This feature is enabled by default, scanning every plaintext file against a set of built-in rules or custom configurations to identify secrets.)
The built-in rules cover a wide range of secret types, including but not limited to AWS access keys, GCP service accounts, personal access tokens, GitLab personal access tokens, and Slack access tokens. Trivy's secret scanning capability extends to different file types and directories, offering flexibility in scanning scope based on the project's needs. For instance, it's possible to specify container images or filesystem paths directly for scanning, and Trivy provides detailed outputs that include the type of secret detected, its location, and the severity of the risk associated with the exposed secret.
Secret Detection Customization
Furthermore, Trivy allows for the customization of scanning rules via a configuration file (trivy-secret.yaml), enabling teams to tailor the secret detection process to their specific requirements. This includes defining custom rules and exceptions, as well as adjusting the scope of scanning with options like --skip-dirs or --skip-files to exclude known test secrets or other non-sensitive data from scans, thereby speeding up the scanning process and reducing false positives.
An important tip for using Trivy's secret scanning effectively is to ensure that base image layers are detected and skipped, as they can contain many files that slow down the scanning process without contributing to the security assessment of the final image. The --debug flag can be helpful in diagnosing issues with secret detection, particularly in cases where secrets might not be detected as expected.
Secret - Trivy (aquasecurity.github.io)
IMAGE Signature
Image signature is currently implemented and used only on production container registry.
At the moment, development images are not signed. However, each images provided to our end customers are signed for production purposes.
Image signature is mentioned in global SDLC procedure in the RELEASE section (3.1.5).
Delegation keys should be created manually for each image repository.
This section will describe how image signature are implemented in our release pipelines and how to create delegation keys for new image repository.
We mostly follow the recommended Docker documentation (https://docs.docker.com/engine/security/trust/) with adaptation for Azure Container Registry and Azure Devops Server pipelines.
Key management
Full documentation : https://docs.docker.com/engine/security/trust/trust_key_mng/
In all case, the following items are stored on Devolutions, only available to the necessary people:
· Root private key and passphrase
· Repository private keys and passphrases
· Delegation private and public keys and passphrases
Release pipeline integration
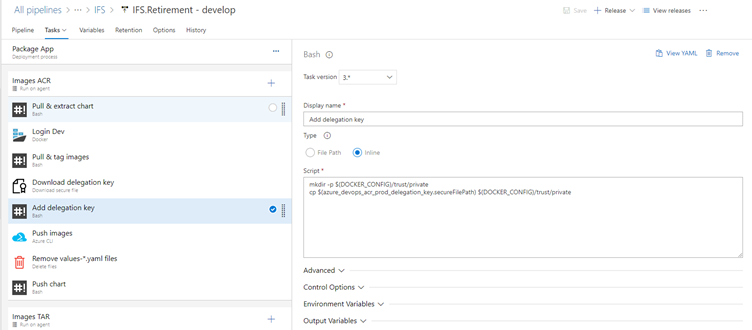
Before push image into product azure container registry, the pipeline will configure Docker to sign image with the delegation key:
Download delegation key
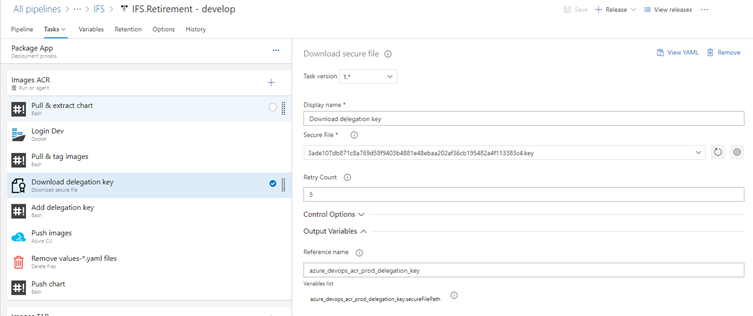
Add delegation key
Add the delegation key to Docker private key:
Sign and push images
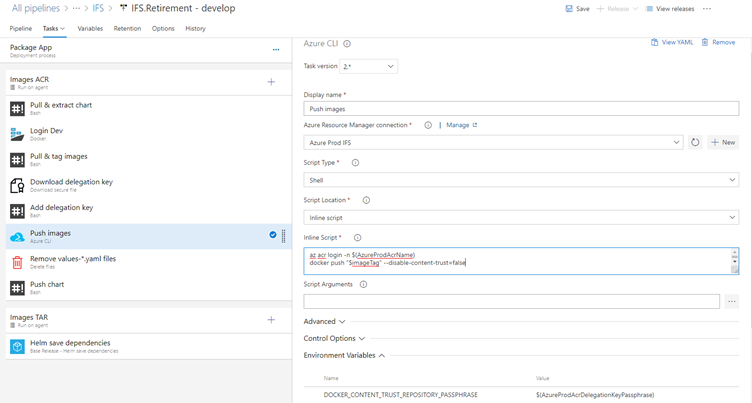
1. Login to azure with azure service connection. The service connection should have image signer and image push roles.
2. Login to acr :
az acr login -n $(AzureProdAcrName)3. Define the environment variable DOCKER_CONTENT_TRUST_REPOSITORY_PASSPHRASE with the delegation key passphrase.
4. Push the image with --disable-content-trust=false parameter to force content trust.
Initialize keys for a new repository
The repository key should be initialized and added to the delegation key before singing an image.
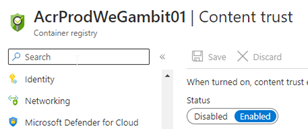
Requirement
· ACR Premium with notary enabled
· Docker
· Azure CLI
· Content trust should be enabled
Saving Signature Key
You can save your key inside an HSM (Hardware Security Module).
1.1.1. Signing steps
- Login to azure. The account should have image signer and image push roles.
- Login to ACR :
az acr login -n acrName- (optional - only if there is already an existing root key) Get the private key from Devolutions and add it in your Docker: %UserProfile%\.docker\trust\private
- Push an image in the new repository with --disable-content-trust=false parameter to force content trust. The image has no importance and can be deleted after the initialization.
- (optional - only if there is no root key yet) The prompt will propose you to enter a passphrase to create the root key. Generate it and save it in HASM with the associated private key: %UserProfile%\.docker\trust\private
- (optional - only if there is already an existing root key) Enter the passphrase of the root key (from HSM)
- The prompt will propose you to enter a passphrase to create the repository key. Generate it and save it in HSM with the associated private key: %UserProfile%\.docker\trust\private
- (optional - only if there is no delegation key yet) Generate delegation key (the default algorithm used is a 2048-bit RSA key) with:
docker trust key generate delegationkeyname
- The prompt will propose you to enter a passphrase to create the delegation key. Generate it and save it in Devolution with the associated private key: %UserProfile%\.docker\trust\private and public key: %UserProfile%
- (optional - only if there is already an existing delegation key) Get the private key from Devolutions and add it in your Docker: %UserProfile%\.docker\trust\private. Get the public key from Devolutions and add it in your Docker: %UserProfile%
- Add the delegation key as signer of the repository:
docker trust signer add --key delegationpublickey.pub delegationprivatekey repositorypath- Enter the passphrase of the repository key
You can use docker trust inspect to see associated key of a repository :
docker trust inspect --pretty repositorypath